Pages

Showing posts with label Biscuit/Sponge. Show all posts

Wednesday, 30 October 2013

Baking - Lemon & Wild-Fruits Eskimo

Blah. 

I woke up this morning feeling like crap.

Actually, I very much believed that I sleep-walked to school today. It was the time of the month, I felt so sick and unwell, but hey! I've never missed a single day of class, and I am not going to break my crystal clear record today!

So off to school I went.

Yesterday's demonstration was all about modern creations. Chef Fabrice showed us two different entremets, Lemon & Wild-Fruits Eskimo and Crispy Pistachio Sphere Apricot & Passion Fruit.


First up, the lemon & wild-fruit Eskimo is an entremet that looks like an ice-cream pop.

It has got a sweet pastry bottom, a hazelnut cream layer, raspberry jam and the 'ice cream' pop is actually lemon mousse with a wild fruit coulis jelly in the center and, filled in a cylinder mold with the dimensions of 8cm X 3cm.

The Eskimos gets the shiny white look from using a white glaze, which includes ingredients like cream, milk and titanium dioxide.


During the demo, Chef Fabrice has a fair bit of extra time, and he showed us a snippet at what it would be like, doing sugar works. He was working with the sugar art recipe, folding hot sugar repeatedly, and did a few swirls and hoops like the above.

The colored hoops was made using white and blue sugars, and putting them together like how the peeps at Sticky, a Singapore local store which sells handmade candies pull and design their candies. It was quite intriguing, and I am looking forward to trying my hands at pulling sugar.


Chef decorated his Eskimos with squares and long chocolate rectangles, raspberries and gold leaves, as usual. He gave us the free rein to do either outlook for the Eskimos, either having them assembled horizontal or vertically. I chose to do them horizontally.

More on this later.


Next, we have the Crispy Pistachio Sphere Apricot and Passion Fruit, which is a pink white chocolate sphere filled with lime mousse and with a apricot passion fruit jelly center.

It's assembled on a 'crown' made from baked left over sweet pastry filled with raspberry jam and sprayed with pink chocolate spray; making the appearance looked more like a hot pink ball.

Mew commented that it looked like a Pokemon Ball, which was used by Ash and his pokemon friends to catch wild pokemons in the cartoon. I thought it looked more like a golf ball, and when Chef cut the sphere to reveal the inside outlook of the sphere, the whole class agrees that it looked much like a salted egg. HAHA!

Presenting to you, my lemon & wild fruits Eskimo!


We needed to only present 3 pieces, so I decorated only these 3.

Today's practical was quite straight forward, and instead of working in teams of two, we worked in teams of 6/5 today due to the fact that the recipes is quite simple and needed a longer freezing time (which means lots of spare time), plus, we didn't need to do the white glaze because there was so much of the left overs from the previous class yesterday.

So lesser components to prepare = more time to do other things.


More time  = more time can be spend focusing solely on assembling.

I had a design in mind yesterday during class, I wanted to present like, 3 'diamonds' on top of the Eskimo in a orderly manner, but the top surface area was not wide enough to accommodate all 3 chocolate squares. So, the second best option was to place the 'diamonds' all over, creating a mess. In a beautiful way.

What do you think of it? 


We were given only 1 raspberry and I had the idea of putting it right in the centre to be the 'jewel', with chocolate shards around to further enhance the white and dark colour contrast between the white glaze and the dark chocolate, and at the same time, have a nice pop of colour.

It's always hard to work with fruits; I'm always having a little struggle with decorating because, with decorating; it's either too much, too empty, somethings missing or too little.


Last but not least, I decorated my Eskimo with the chocolate rectangles, which is a reference to what chef has presented during demonstration.

Cascading long chocolate planks covered the Eskimo. I love the transfer sheets! It totally ups the style factor for an entremet.

I went to a bakery supplies store in the afternoon with my friends, and managed to get my hands on some beautiful Christmas themed transfer sheets! Can't wait to get back home and see what I can do with the designs! =D 


A layered view of the Eskimo. The center is small, piped into small bubble tea straws' dimensions before being blast freeze and slotted during the assembly of the mousse. 


Alright!

That's all that I have to share for today! If I'm not wrong, classic chocolate eclairs is coming up soon, as well as heart shaped macaroons! Well, with me being in Superior level now, I'm guessing the outlook for the eclairs is anything but chocolate fondant glaze on the top. =P

Till then!


Tuesday, 29 October 2013

Baking - Tendresse Log

Happy Tuesday guys!! 

I'm back to blogging as soon I get home from a practical class! Actually, it's because I have nothing to do. Half of the reason is also because Star World is now playing "The Apartment - Design your destiny", a reality show consisting of people from all kinds of occupation coming together as different teams competing to win a house (If I am not wrong), and they compete by creating a room with a limited budget to meet the requirements for that challenge.

Like, create a entertainment room with a Star World's element within the room.

It is incredibly boring, like someone decided to come up with this concept, get a few Z class actors to be the judges and host, and pass half-assed comments to the participating teams, none of the comments made any sense.

Even the winning team wins on what basis, I have no idea. Like, the colours is nice, the combo is nice, but practicality wise, you can't open the door to the balcony because the sofa is in the way and their "Star World" element is close to zero, yet the team can still win the challenge.

The host will announce a cheesy tagline like "Let the court begin" during the results slot time and bang his hand against the table like those judges in the courtroom does...with a hammer. He bang his HAND. Hand?! Like WTF? Low budget??

Aiyah. In short, that show gets on my nerves. Because I just want to watch plain old sitcoms like "How I met your mother", or "Suburgatory" or "Once a Upon a Time" to unwind. But NO! They had to go ahead and play these stupid shows.

Okay. End of rant. Usually it's Ben who gets to hear all these, but he's not here yet, so you guys have to hear it first hand. =P

Alright. Back to school! Today's a very, very exciting day!!! 

Yesterday after demo, I texted Ben and told him that the upcoming practical class is going to be challenging, and I am super excited about it!

We had Tendresse Log, a Christmas creation and the demonstration for making candied chestnuts - both of which was conducted by Chef Fabrice, who was back from his 2 weeks long India Business trip.


First up, we have the candied chestnuts - which is basically canned chestnuts (Sabaton brand), the best French chestnuts out there, canned in vanilla syrup, with a single vanilla pod.

The chestnuts has to be warmed prior to being glazed by a mixture consisting of white fondant, chestnut cooking syrup and rum (optional). At first, it's completely white due to the re-crystallisation of the sugar, but upon drying the excess glaze in the oven at a high temperature of about 220℃ for 2-3 minutes...the colour of the chestnuts turned into a shade of shiny brown, like the above.

I had a bite, and the chestnut is lovely, not overly sweet or starchy - just creamy and melts in your mouth.


Next, we have the Tendresse Log, which was assembled in a plastic mold with dimensions of 8cm X 48cm long.

With a size that long, I was really shocked at first. My cake container is big and spacious alright, but how is it going to take in all of a 48cm long log! Then I heaved a sigh of relief when I realised that the recipe is for 3 pax. *Kua kua kua*

Whew. Lucky container; that was a close shave. *wink wink*

So, with 3 logs to assemble, Chef shown us three different looks which can be created.

The main aim of this practical, is to create a beautiful commercial chocolate flower. (How is this commerical, I'll never know. I've not come across such elaborate flower while back home.)

The above log consists of a single chocolate flower made with two rounds of chocolate petals (using the spoon method), and decorated with cut out chocolate transfer sheet of Papa Noel.


The second log is decorated with a chocolate flower as well, but created with stamen surrounding the ovary and with petals around. Of course, chocolate works is always outstanding with gold powder. But we didn't get to use some because Chef Willy (who was supervising us in class today) said that it's OOS for us because he used too much during the demo. (duh!)

The third log is decorated with chocolate shards, macaroons and rose petals! Simple, classy and oustanding isn't it! The red petals really gave the chocolate a nice pop of colour.

Alright, let's move on to my finished product shall we!

It was a busy practical, but the workload is shared among 3; Mew, Charmaine and myself.

This is a new creation for Christmas Log, with a feuilletine base, layer of chocolate flourless biscuit with a Irish creamy ganache center, covered with coffee mousse and glazed with a dark shiny mirror glaze.

It was so good that during the food tasting, Mew was commenting that "the coffee and irish cream should get married", and I became a Justice of Peace.

I went: " I now pronounced you both, husband and wife.".

Turning to my friends, I went "You may now proceed to eat the couple". *ROFL*   


I was in charge of doing the glaze, the piping of the chocolate petals and doing the coffee punch. 

Then, I messed up the syrup part for the punch, heating my sugar and water till it was 117℃ instead of just till the sugar melts, and I scared myself silly when I noticed lumps was forming (crystallisation occuring).

It was fun to use the mycryo again for the chocolate, because we didn't have to tablage, and it was so much faster!


Of course, if I were to do the chocolate decorations at home, I'll not use Mycryo because it's twice the price for a kilo of chocolate. *Blah*.

There's a little story of how my class's macaroons turned from white to pink ones. Some other class used ours by mistake. So, we had to decorate our logs with pink/limited whites macaroons and a single raspberry.

I'm actually shamelessly happy with myself on this - I didn't know where to place the raspberry...it's not pretty if I place it side by side, it's weird if I place one behind, the other in front of the flower. I quartered the raspberry, placed a little glaze on the inside of the macaron and created a pink raspberry macarons.

Eh, not bad right! HAHA!


Pretty proud of my first attempt at this "commercial chocolate flower". Center ovary is made using chopped chocolate chips, compressed and freeze together in a dome mold.


Oh, hello Papa Noel!

Chef Fabrice was going "Eh, there's papa noel, so cute ah! Like a Christmas"!

It took me a few moments to realise Papa Noel = Santa Claus. HAHAHAHA! Chef Fabrice is like most dramatic chef ever. He squeals when the flower slided off the cake once, he sings when he's stirring the chocolate bowl, he makes sound effects when he's assembling the components.

I thought Mew, my partner was like the ultimate noisiest sound effect person I could have ever meet; she purrs, she barks, she chirps, she sings to her cake, sings while whisking or folding, sings into my ear randomly, makes bombs and guns sounds out of the blue, she definitely takes the cake.

HELL NO!  Chef Fabrice is like her godfather. *face palm*


More Papa Noel! My personal view of this shape, is that it looks like a bed/coffin rather than a log. I would love to bake this this coming December, so I'm on the hunt for a nice shaped mold! 

Hopefully I can find it, otherwise I'll have to completely change the outlook of this cake by removing the glace and probably using chilled ganache to create that classic log effect. =)


Alright!! That's the end of my lovely practical - best practical class in weeks, in fact!

Thanks for dropping by, and reading/glancing at pictures/whatever that you guys do when you are in here people. I've seen a huge increase in readership, and I hope it's because you are a friend/future pastry chef/future school mates checking out the cakes in the different levels etc. Whatever that you do, I hope my posts put a smile on your face.

I've not been able to fully unleash my baking goddess yet, but come end of my course, I'll bake like mad, get a job and finally do what I super love!

Till then!

Sunday, 27 October 2013

Baking - Lime & Milk Chocolate Cake, Horizon Entremet and Sensation Dome

Happy weekend!

I've spent my long weekend coup up at my apartment, ordering take away and cooking healthy meals for myself, while going hard at workouts. The issue of losing weight and eating healthy has been on my mind since forever.

I wasn't at my best during my wedding, but I wasn't at my worst either. Since the start of my course half a year ago, I've been looking larger than usual because I've let my muscles slack, and muscles turn back into fat. I'm actually weighing the same as when I was at my wedding, but due to the muscles slack, I'm not looking any petit either.

So I'm back, working hard in the gym, pushing myself as hard as I can, so that I can gain back some much required confidence and all. =)

I hope your weekend was way better than mine!

Anyway, to update you guys on how I've been doing - besides the above issue that I've been strangling with, feeling a little lovesick and homesick, and craving for a good old chocolate cake/cupcake...I'm actually finding it hard to love what I'm doing currently in Superior term.
 
It's basically a recap of some of the basic recipes we've learnt in Basic, and combining it with jelly, with cream, etc and then re-dressing it/decorate the different classics differently, modernly, a new messy way of presenting.

Sometimes it's beautiful, sometimes it's not.

Most times so far, it's kinda boring. Oh yes, when I get back home, I hope to explore different ways to dress my cake up, but for now, what's most important for us to do, is to know how to duplicate the same product/look and not do anything drastic that changes the whole look of the entremet altogether.

I'm not sure if you guys will get me, but that's how I feel...

Anyway! For the past week, we've had a few hits and misses (at least for me), on Monday, Chef Willy went through the demonstration for a Lime & Milk Chocolate entremet and Banana Chocolate entremet.


The Lime & Milk Chocolate is an entremet with a baked crispy almond base with a lime dacquoise and lime cream insert, and topped with milk chocolate mousse. The cake is then decorated with a tempered chocolate strip around the cake, and with chocolate flowers. More on that later.


The Banana Chocolate is a entremet with a chocolate feuilletine base with a chocolate flourless biscuit and banana insert, covered with dark chocolate mousse and glazed with a mirror glaze. It is also decorated with macaroon shells.

Chef Willy blended the banana after caramelising it and freezing it as an insert. I wished he didn't do that so that we get to taste bits of the banana, which would go really well with the dark chocolate mousse. Well, as usual, we always get to do the one which doesn't as good as the latter. HAHA! (Not that the lime cake is not delicious, it is! But I would love to do some banana & chocolate combo for once!)

Presenting to you, my Lime & Milk Chocolate Cake!


The only difficulty present for me, was to do the chocolate flowers. As this is milk chocolate, it melts faster than usual as compared to the dark chocolate. I was nearly half way through my chocolate tray, before I could finally start creating some decent petals for the first of my 3 required flowers.


Oh milky, why do you need to melt that fast!

I'm happy, though that my flowers has that pointy outlook to it, now that I finally used the fish knife correctly. I did, however, also managed to slice the skin off my thumb repeatedly, but not deep enough till it bleeds (thank goodness).


I love the look of the chocolate strip too! Having learned from my past mistakes of not having the correct length of the chocolate strip, I cut my strip longer this time, and my chocolate wrapped around the cake beautifully, meeting from end to end.

After practical class, I went for dinner with my friends, and ended up giving away my cake at the same pharmacy again. HAHA!

Then for Tuesday, we had the demonstration for Horizon entremet and White chocolate with red-fruits cake.


The Horizon entremet is a new style cake thought of and created by Chef Willy. It is a cake with a sable breton base, layers of sponge cakes and a pabana coulis insert, and topped with Vanilla Bavarian cream, filled in a special type of plastic mold. More on that later.


The White Chocolate with red-fruits cake is an entremet witha sacher biscuit bottom, with a red fruit compote insert, topped with a white chocolate mousse and decorated with lady finger rectangles.

As you can see, the creation of a French entremet (as far as I've learned) is to have something soft, something crunchy, something sweet/sour and something light. If you've created something, it is best to review the basics to confirm that your entremet has covered all of that, so that you gives your consumer a delightful consuming experience.

It's just about playing with flavours, with textures and then decorating it in the simplest ways possible, not too much decorative items because that can overwhelm the outlook of the cake and also, you wouldn't be able to connect to the flavours within at one glance.

I foresee myself throwing tons of cakes out this coming December - January when I'm back home baking cakes for sale! =D To come up with one successful cake, I'll probably have to face a lot of failures.

Ah well, the above cake was delicious, but as usual, we got to make the former cake. Hence, presenting to you, my Horizon entremet!


Which is a far cry from Chef's during the demo class.

I didn't managed to unmold my cake successfully from the plastic mold, which we were using for the first time. We had to soak the whole plastic mold into warm water, before applying slight pressure on the sides and letting the cake unmold on its own.

Either I didn't blast chill it long enough, or that I applied too much pressure, and that resulted in damaged "steps".

I told Chef that my entremet isn't a forest. It's actually Ang Kor Wat (A restored temple) . He agreed and suggested that I should have place some pebbles instead. HAHA!


I had fun doing the chocolate trees though! =)

Then, for classes on Thursday, we had the demonstration on Seventies Dome and Sensation Dome


The Sensation dome is a entremet with a sable breton base and layers of pistachio dacquoise, creamy raspberry insert and topped with white peach mousse. Woohoo! Finally we're doing something different, like using peach!

The outlook of this entremet had me squirming in my seat, because it did not looked anything as cute as Teletubby (Chef Willy and his nonsense again.) It looked like a brain with serious tumours growing on it, and at one point of the time, it looked more like boobies.

Then, something magical happened. The moment he put those rose petals and the sugared daisy...the whole damn thing looked cute again. *FTS*. I wished I had the daisies too, so that my cake can look equally cute! Blah.


The Seventies Dome, is an entremet with layers of almond sponge cake, a mango creme brulee insert and topped with caramel mousse, before being glazed with a caramel glaze and decorated with chocolate discs.

Quite an interesting entremet, I must say! The difficult part about making a caramel mousse, is that it is rather hard to maintain the same caramel colour and consistency day in day out, especially if you are going to make this cake for sale!

Again, this is one of Chef's creation, he thinks it looked like a disco ball (Sometimes, I wonder where on earth his ideas came from...) *face palm*

Presenting to you, my Sensation Dome!


Well, I must say, I'm quite proud of my piping skills nowadays, I managed to pipe equal macaroons sizes, and made enough pairs for the next practical class, for another entremet.

The cake is perfect (In Chef's words) and I felt it was quite messy, but in a good way. Chef Willy was going "More macaroons, more macaroons!!", so the whole class was busy sticking macaroons and domes and then went off to spray the cake pink.


Then after class, I gave my cake to the preps kitchen, because there's no point in bringing the cake back home! No one's gonna eat it (not me) and so the next alternative, is to give it away =)

Alright, that's all I've got covered up for the past week! I'm looking forward to this coming Saturday because Ben is coming down for a visit, and I can't wait!!!

In the meantime, hang in there people (Or me!), the next few weeks is gonna get better! Or for me, the next few weeks will be dealing with slightly more interesting cakes! Woohoo!

Till then!

Monday, 14 October 2013

Baking - Club Sandwich, Chocolate Caramel Tartlet & Chocolate Vanilla Pear Tart

Hello!

It's exciting to be back to school, and having a change in chef carrying out the demonstration classes. This term, we have Chef Fabrice, who is the Executive Chef in our school. 

He explained that the superior level is all about reinventing the different pastries we have seen before. It's all about the modern take on old school pastries, new presentations and interpretation of desserts. Of course, there's also the chocolate works, the sugar works and the long exam hours. 

I'm due to take my exam on 19th December, and my graduation is on 20 December. Due to to Ben's work schedule, I've arranged to return to Singapore earlier than expected because I didn't want to spend the New year being apart - so any friends who's planning to throw any awesome New Year Party, please don't forget to invite me & Ben! =) 

Alright, back to school! 

Our first demo for Superior, was on Picnic Cakes, where Chef Fabrice did a demonstration on Club sandwich, Cheeseburger and Pizza, all of which, is a play on traditional food.


Here, we have the Pizza, which is  made with a brioche dough as the base, spread with a filing made of butter, brown sugar and sour cream. Topped with coloured pomelo, candied oranges and cubes of panna cotta as the "cheese".

Cocoa powder or icing sugar is then sprinkled, acting as the Parmesan cheese.

I thought it was a really creative way of reinventing desserts as food. =)


Next, we have the club sandwich, consisting of 5 different components, we have the pistachio genoise sponge, the vanilla cream, coulis, punch and dark chocolate finishing. More on this later.


Next up, we have the Cheeseburger cake, which is one of the creation by Christophe Michalak, one of the up and coming famous pastry chef who is apparently a big super star now in France for his playfull take on pastry as well as his boyish charming looks. 

I found this super adorable!! We get to have a mini one during the food tasting, and boy, it does look like a cheeseburger, doesn't it??

The "buns" was created using viennese dough/brioche dough, the "cheese" slices is made up of passion fruit jelly and white chocolate glaze, and the "steak" is made up of chocolate mousse and coated with almond milk chocolate glaze to give it that rugged meat look.

Presenting to you, my very own Club Sandwich! 


Green Pistachio Genoise sponge, imbib with raspberry punch and "filled" with bavarian vanilla cream and raspberry coulis, before being sandwiched with chocolate slices, which have been tempered on a transfer sheet.

Beautiful, isn't it?


I'm pretty sure this can be brought out as a travelling dessert for a real time picnic, because properly tempered chocolate slices will not melt, and the cream and all wouldn't melt either, if cooked properly. =)

Then, for the second class for the week, we had the demonstration for Chocolate Caramel Tartlet and Raspberry Tartlet & chocolate mousse. 


The chocolate caramel tartlet consists of a sweet pastry bottom, filled with soft caramel and nuts like pistachio, hazelnuts and walnuts. Topped with a slice of dark chocolate and praline chocolate mousse and sprayed with a chocolate coating.  More on this later.


The raspberry and Chocolate tartlet is a little entremet with sweet chocolate dough base, chocolate biscuit, raspberry jelly in the center, filled with chocolate mousse and glazed with a shiny chocolate glaze. The sides is then decorated with feulletine.

It's a soft cake with layered textures and surprisingly not very sweet, which is good! =)

Presenting to you, my chocolate caramel tartlets! 


Spraying the chocolate mousse with a spray gun was difficult, as the mousse has to be frozen enough to achieve a nice velvet appearance. During the chocolate mousse preparation however, the mousse was setting a little too vividly, so I didn't managed to fill the mold correctly, hence resulting in a few holes being present. =(


On the other hand, I had fun with my chocolate decorations, which is made with a paper cone and piping the chocolate on a bed of sugar. I think it covered the top of the mousse just nicely and give it a little edge. =D

As for the last class of the week, we had Hazelnut Yuzu Tart, Chocolate Vanilla Pear Tart and Pop Colonel Tart. 


The Hazelnut Yuzu Tart consists of a almond short crust base, filled with hazelnut cream and a fruity chutney made with pineapple, papaya, mango etc and topped with a yuzu light cream disc, before being glazed and decorated with orange segments, roses and gold.

The interesting thing about this tart, is that the hazelnut cream is somewhat like the almond cream, and needs to be baked.

After so many tarts, I simply only adore those filled with pastry creams, chocolate etc, and not those baked ones. =D


Next, we have the Chocolate Vanilla Pear Tart, consisting of a almond sweet crust bottom, pear compote, filled with a nice ganache filling, topped with shapes of vanilla cream and glazed with a dark chocolate glaze. More on this later.


Last but not least, we have the pop colonel tart; a tart by that name because it has got vodka added.

The tart consists of a sweet pastry dough, filled with lime mousse, and lime jelly insert, and topped with vodka jelly and a lime glaze. The decor is very minimalist, and the taste is extremely sour, duh! In my own opinion, I think this is another take on the old classic key lime pie/tart.

Presenting to you my Chocolate Vanilla Pear Tart!


If you've not noticed yet - this is the very first time I'm dealing with making a square tart. It's a lot harder because you need to get the corners in, before working on the sides, otherwise the tart will not have the nice angle you want, after baking.

Then, we have the second difficult part to deal with - glazing the tart. The dark chocolate glaze sets really fast, as you can see, right after I'm done with one whole area and returning back to where I started, the glaze doesn't merge together, creating an ugly border instead.


To finish off this tart, we also decorated the sides with chopped pistachios. I had to glaze one side and glaze and repeat that process, otherwise the pistachios will not stick at all.


I packed all of the cakes for that week and embarked on a short trip back to Korat with my mother, sharing these goodies with my relatives back home. =)


My cute mummy who sent me to school on the first day, waited for me for 3 hours to finish school, and after that on the second day, she didn't join me again because it's a 6 hour long school day. HAHAHA!!!

While in school, I had many classmates coming up to me, thinking that my mum was a sister/friend to me, and it was making my mummy as happy and proud as one can be! HAHAHA! Yeah lah, my mum looked like my sister now ah! So much so she bought a tub of expensive gold mask to apply, so that she can be even younger looking. *ROFL*.

I hope it works for her though, because I've purchased one tub for myself too.  HAHAHA!

That's all for now, till then!

Tuesday, 24 September 2013

Baking - Croquant Gianduja, Noiselier & Yoyo.

WARNING: LONG & LENGTHY POST! 

Hello guys!! 

Phew! What a day!!

I just completed my practical exam in the afternoon, and as you can see from my Instagram/Facebook, I've passed and will be able to fly home right on schedule this coming Wednesday!!!

More on my exam experience tomorrow, as I would like to wrap up the last demonstration in the next post as well! :) Meanwhile, allow me to share with you the final few practicals I've done to conclude the Intermediate Level for Pastry!

For last Wednesday's lesson, Chef Marc did the demonstration for two recipes, the Croquant Gianduja & Gianduja.


The Croquant au Gianduja, a.k.a Crunchy Gianduja, is a entremet with a insert layer of Chocolate flour less sponge, dark chocolate feuilletine base, Irish Cream layer and filled with Gianduja Cream, before being glazed with a chocolate dark glaze with mirror glaze and finally, decorated with streusel pieces.

I am deeply in love with the enticing flavours of this entremet, especially the Irish Cream, which we have added a substantial good amount of Baileys. Heehee! More on this later, because we did this during our Practical!


Here, we have the Gianduja, which is a small mini entremet consisting of a sablée dough base, hazelnut gianduja with tempered chocolate and chocolate coating with diced almonds.

It's more like a petite four type of assembly, with the tasting slightly a cross between a melt cookie base with a chocolate bonbon on the top.

I'm sure, you guys must be thinking, what is Gianduja???


Gianduja, is a paste made out of 70% Milk or dark chocolate, with the other 30% being finely crushed nuts like hazelnuts and then added with icing sugar and fats, like cocoa butter, pastry butter or heavy cream.

It is also characterised by its smoothness, so I am not really sure if I can do this at home on my own, because I highly thought that my food processor can process substance till as fine as 20 microns per whatever or however they calculate it.


I had quite a fair bit of my fun, doing the pastry cream for the Gianduja Cream, and making the streusels for everyone else. Mew was mad happy over the fact that there's alcohol (Bailey's) in this recipe. She was, however, quite unhappy that we had to boil the Bailey's and milk separately to prevent the milk from splitting.

She couldn't bear watching the Bailey's evaporate right before her very eyes. I was on the other hand, busied with making the Gianduja Cream (More whipping cream, melting of gelatin, chocolates and what not.)


Check out the beautiful layers! *Obsessed!*

Ben was lucky enough to be here the past weekend so we ended up devouring a quarter of this beautiful cake together (Oh yes, cue the mushiness and the love song). It was really good, he said, so I packed the other half for him to bring back home to Singapore. =D

One thing that weighed heavily on my mind, was the glaze. It is the same damn recipe of Chocolate Dark Glaze, which I've miserably failed to let it set the very first time I've used it - on the Bavarois deux Chocolats

This time round, I heed Chef's advice to let the milk and water boil slightly longer, before adding in the rest of the other ingredients - Neutral glaze and the cocoa powder. Actually. I soon realised that the previous attempt could be due to the fact that we had used neutral glaze with water added in already, instead of new neutral glaze, which is completely devoid of water.


Mew and myself cried tears of joy when it set beautifully. Could be better lah, in terms of sieving the glaze a second time to prevent little air bubbles and remove little unmelted chocolate bits. 

But hey! Successful try, I would say! =)

Next up, on Thursday, we have the Chocolat Citron and Noiselier demonstration by Chef Marc. 


The Chocolat Citron a.k.a Lemon chocolate is an entremet with an insert of chocolate biscuit base, chocolate mousse and Madeleine Lemon layer, before being filled with Lemon Mousse and White Vanilla Glaze. Finally, it is decorated with Macaré, a square type of Macarons. 

The flavours was a refreshing change from the usual raspberry and coconut combination, which is a change that I welcomed.


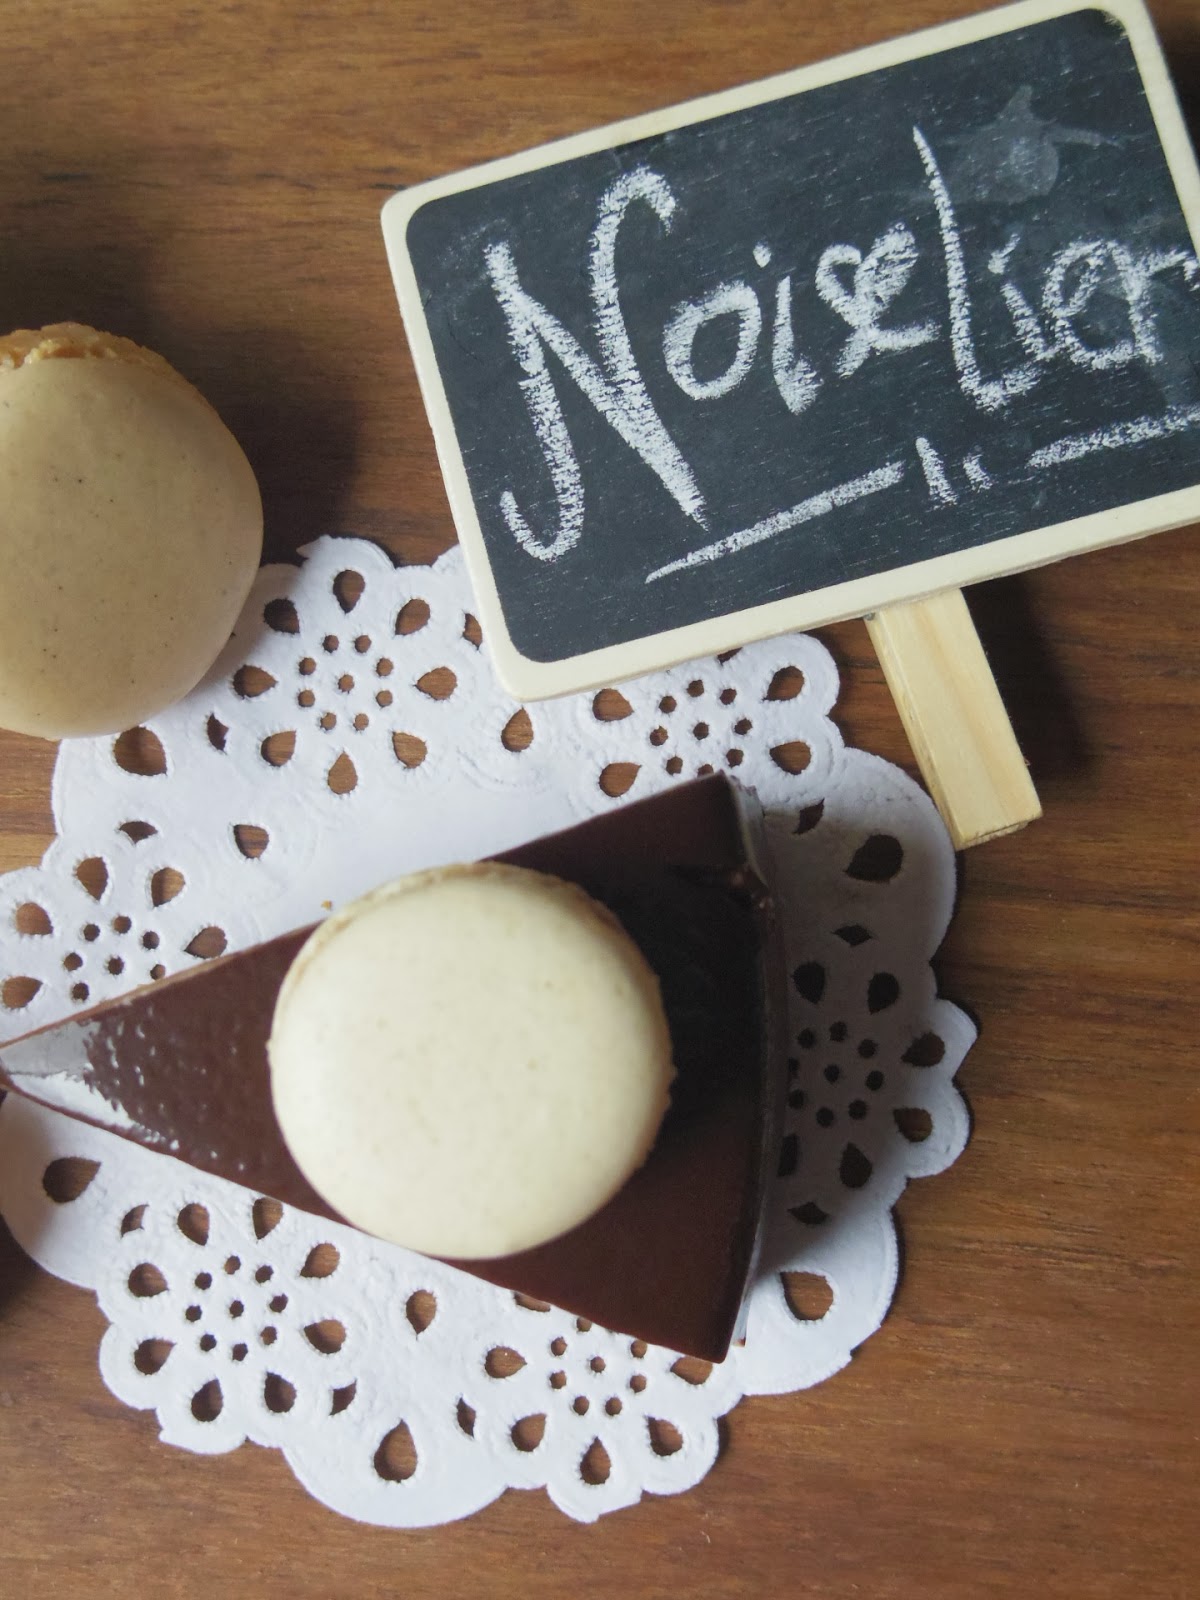
Next, we have the Noiselier, something that looked just like the Bavarois Deux Chocolat, with the same dark chocolate glaze being used, and the decorated with macarons around the sides.

I was slightly reluctant to do a photo shoot on this cake, because it's a little too similar to the Bavarois Deux Chocolat and even shared some similarities to the Croquant Gianduja on the inside layering.


If you're wondering what has Laduree got to do with my cake, well, all macarons other than the tiny one on the cake, is brought over to Bangkok by my lovely hubby, who has pampered me silly with my favourite sweets!

Okay, back to the cake. 


Have I mentioned that this entremet consist of a baked streusel base as the insert together with hazelnut cream, a layer of hazelnut dacquoise and filled with milk mousse, before being covered with the dark chocolate glaze.

This time round, we did so much better with the glaze and controlled the temperature well enough, as well as not have one too many air bubbles. We also made sure to sieve the glaze twice before use. That made me feel so much more confident with doing the same glaze if I have any cake that uses this glaze during the exam.


As you can see from the  layers, the only difference is that there's a layer of hazelnut dacquoise in the middle instead of the chocolate biscuit in the Crunchy Gianduja.


That pretty much wraps up my last week's practicals!

Then, for yesterday, we had a written examination during the first 30 minutes of Demo Class before Chef Fabrice began his demonstration for Tartelette aux Fraises et au Romarin and Yoyo. 

The written exam was fine, because I seriously studied the key topics and was quite pleased that most of the questions was in relation to that. I do hope that I get a pretty good score as compared to my Basics scores. I'm still a Singaporean you know, experience counts and skills counts, but I do feel happy if I get good results. HAHA!

Chef Fabrice is the school's Executive Master Chef, and the superior level would be taught mainly by him. When he first commenced the class, everyone was dead silent. I swear I could hear a mosquito buzzing. Then, midway through, his serious facade soon cracked and we were laughing so hard at his antics and funny faces, and his ability to make us want to learn more soon, won me over.

He's really coaching, sharing valuable information on a few key points of baking, but most importantly, he was teaching us, the importance of respecting each ingredients - that one ingredient can help or kill off the other ingredients. Yes, it seems basic enough, but often, the reason why both students can have the same exact ingredients yet produce different goods, is the attitude towards doing what you're doing. =)

It's really interesting. I hope to share more of my thoughts during the superior level.


Alright, moving on.

We have the Tartlette aux Fraises et au Romarin a.k.a Strawberry Rosemary Tartelettes, a mini tart with a sandwiched filing of rosemary mousse and strawberry coulis.

According to Chef, this is a look at the new generation for presenting. Having the tart shell around the filing, instead of always underneath the filing. The pastry world is ever changing, we can do whatever we want, but make sure it's practical, or simply, easy to eat.

The rosemary mousse, is a winner. When I saw rosemary listed as one of the ingredients, I was thinking about whole turkey/chicken and even the Foccacia Rosemary, but the thought of it being a mousse didn't cross my mind. However, the whole combination with the crisp Pate Sablée made this a winner.


Last but not least, for the final practical to conclude the intermediate level before the exam, was this.

Yoyo, a.k.a erm, yoyo.

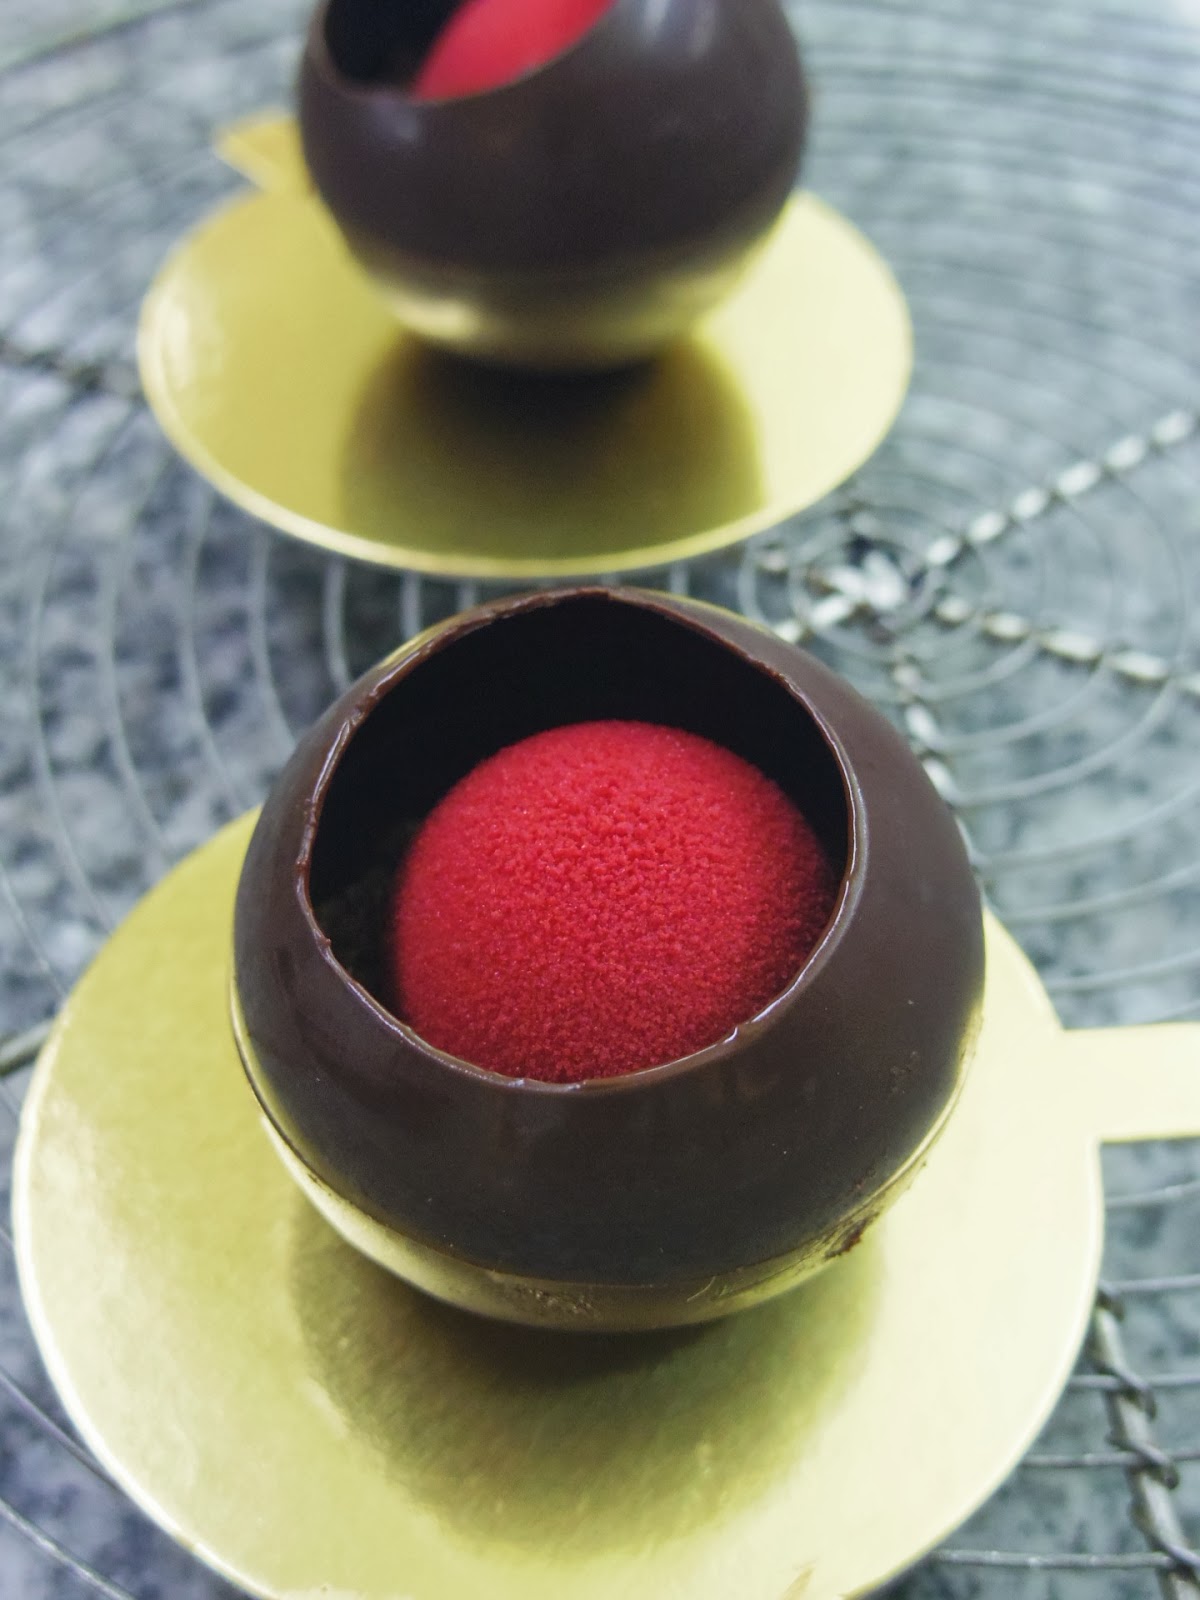
It's a beautiful chocolate sphere (2 halves joining to become a ball), filled with Nutella cream and crumbled dough speculos, and finally topped with a nice little Raspberry mousse dome. My heart's desire to work with chocolate is now kinda appeased because we get to make the chocolate spheres in the mold, before unmolding and getting it assembled. 


The school didn't have enough flexible moulds to cater to the size of the chocolate spheres and raspberry domes which is the same as the Chef, so we made little Yoyo instead, about 30% decrease from the original size.

With that, we had so much of the ingredients left, and chef gave us the dessert glasses to take home! Mew and myself had so much fun doing the assembly. It feels like we are really at work. HAHA!


We topped the mini dessert glass with the chocolate cut outs from the spheres and the less than perfect raspberry mousse domes.


As for the actual Yoyo, we only have to make two, and present those two. It was quite a tough job trying stick the halves of the chocolate together, because this was our first try, the chocolate spheres turned out too thin on one side, and thick on the other.

So while trying to attach the top chocolate to the bottom chocolate piece, I was pretty much shaking and trying my best not to crack the chocolate into two. We had gloves on though, so that helps a little.


A closer look at the inside of the Yoyo. You can see the crumbled dough speculos and the beautiful sprayed raspberry dome, sitting on the bed of the nutella cream! I piped my nutella cream and filled the dough twice into the dome, because it was rather flat looking during the first time.


And that, my friends, marked the end of my Intermediate classes. I'm more than ready to head back home and recharge, before my next & last 3 months for the Superior classes. I'm actually tired, both mentally and physically.

The studying and baking has taken a little toll on me, and being away from my friends and families is somewhat draining me out. I'm not going to lie and say that life have been a bed of roses, it is straining to be studying out here on my own, staying alone.

I miss everything I've left behind in Singapore to be here. 

Alright, 2 more days till I'm back home! Gonna recharge as much as I can and then be back here to put in all my best for the next term! *Fighting!*

Be sure to check back tomorrow, because I'll be sharing Chef's secret creations and on how my exam went. ;)

Till then!