Pages

Showing posts with label Chocolate. Show all posts

Tuesday, 15 July 2014

Baking - Final Exam (Entremet)

Hello Peeps!!

Since I've got bitten by the blogging bug, I've decided to just go all the way and clear as many back log as I can!

For the longest time since before the end of last year, I'm pretty sure my friends (those who have been following my blog since the beginning would love to see the very first cake I've created from scratch right!)

Today's blog entry is on my final exam entremet!! 

To be honest, our batch has got to be the luckiest batch so far in LCB's Bangkok!

Reason being, we get to create a cake from scratch!!! The past batches had to create a main entremet and petit fours, but using only one flavour or something. Our exam theme was Christmas Cake, seeing that it's December, and we have to create one new entremet with flavours consisting of dark chocolate AND banana, along with 3 other petit entremets of the same cake.

Our entremet has to be made up of 4 components, not including glaze. 

The moment Chef Fabrice announced our exam topic, the whole demo room burst into anatomies of excitement and panic mode.I can sense everyone's brain started to run through all the ideas and possibilities there can ever be into creating this cake.

Mew started to blabber some ideas and her biggest idea was Harry Potter related, my own mind was driving on adrenaline, churning out ideas after ideas, and basically, our super awesome group started to have insomnia, just staying up all night racking our brains harder than anything else!

Cake can seriously make you sleepless, I tell ya. Like what Chef Willy is always saying "I think of cake before I sleep. I think of cake when I wake up".

That was all that was on my mind - Cake.


We had to do a report with diagrams, clear written recipes and also do up a ordering form consisting of the exact amount of total ingredients required for our examination cake.

This was what I had in mind - I called my cake "forêt enchantée" because I wanted to create a christmas cake with lots of trees, a play between white and dark chocolate triangle decoration, and since I have mentioned to Mew before (a insider joke), I like guys with hot bod, so I shall create a "naked" cake, by using cake crumbs to glaze my cake instead of using an actual glaze.

There was endless possiblities, but I decided to play safe with my flavours, going with a crunchy hazelnut bottom, salted caramel cremeux, with a layer of sauted banana, chocolate flourless sponge and complete with a dark chocolate mousse.


The only challenge we have, was of us not having a kitchen of our own to practice baking!

We needed to experiment with baking - taking note of how well the flavours worked together, the time taken to complete the whole process etc.

Luckily for us, we had our good friend, Jane to help source for a rental kitchen, in a small baking supplier's store, where the owner was a former student at LCB. All in all, I spent close to 1700 plus baht for about 5 hours for the rental of the kitchen, on top of that, we had to purchase ingredients as well from the shop itself, spending another 1500baht at the shop - on chocolate, decorative gold leaf, flour etc.

The space at the rental studio was pretty big, we used all 6 tables available, fully utilise the portable stove and cake mixers in the shop, and the endless pots and pans and mixer bowls. There was 4 of us, and we all worked well together to fully utilise the oven, baking and tasting and assembling the cake components. I even managed to temper the chocolate using cocoa butter and spread on chocolate sheets for decorations.

The best part was - we didn't have to do any wash up! There was two store assistant in the kitchen to help wash and clean after us, so it was pure bliss and lesser time wasted on cleaning up!=D Well worth the money spent, I would say!

The first trial went well! But I was hardly happy with my final product! It looked so good on screen than in reality, how ever, I must say - It looks exactly as how I drew it on screen. HAHA!


The powdered red sponge crumbs was a hassle to make, and when I started to dress my cake, it looked kinda messy. In fact, the whole cake looked so bad! It was missing something, and I didn't like to use the raspberries at all, it's kinda extra to be on top of a cake that has no raspberry component within it.

The flavours all was really good, because caramel is one of the complimentary flavours which goes well with banana!

Below, is a picture of my petit entremet of the same cake. 


Mew, Jane and myself then packed up and left the studio, returning in another week's time for a final practice before the actual exam.

This time with Framm, I lugged along my trusty beloved IKEA stroller, filled with all of my tools and equipments and ingredients! I seriously looked like an auntie, but it was worth it - espeically when at the end of the practice, the rest was lugging heavy bags of tools while I just pulled my stroller along.HAHA!

Truth to be told, we were really scared to head out during that period of time because the riots in Bangkok was on going, just that day itself when we were in the studio kitchen baking, there was a bomb incident nearby, resulting in us being wary of our surrounding and returning home earlier as possible.

Charmaine, my good friend and classmate also came over to my place for a stay over, for fear that the riots/protests near her place will result in her being late for school and exams.

The traffic was slightly bad, but as we were all heavily dependent on the trains for transport, we were really lucky that the protest didn't occur very near our apartments.

After serious racking and going ideas after ideas, I decided to go ahead with a 50/50 chocolate mirror glaze!

***

This was the end product of my exam entremet - which, to my delight, was the first Christmas looking cake Chef Willy (Who was giving comments and grading) had seen so far during the cake workshop practice. He said the flavours was perfect, I didn't have to change the components. But the only thing is that I didn't managed to glaze well, and my sides was a little untidy, which he then suggest to me to cover up the sides with chocolate squares or something.

He also didn't like the white "christmas lights" which I've used on my dark chocolate "christmas trees" because he didn't like transfer sheets that much.

The thing is, I really liked that christmas light feel. I liked this transfer sheet so much I bought a couple of it to bring home. But since he was one of the judges, I decided to heed his advice and do without it during my actual exam.


A look at my petit four - the cake was so well received by the tasters, and that boosted my confidence by a huge leap! I was more or less rest assured already of my taste, and I looked forward to finishing up my last exam!


Within a week, the day for the exam arrived, and in a blink of an eye (Or rather afters close to 6 hours), we baked, assembled and presented our lovely creations to the judges for final tasting, final judging and final presentation - it was such an important day, that we even had a guest judge, Chef Joël Robuchon! It was such an honour! 

I'm proud to present to you, my exam piece..

 Forêt enchantée !!!


We presented our cakes in the exam room in such a manner - one 18cm entremet, alongside with 3 petite entremets; one with full decoration, one half with the intersection showing, and one fully glazed. 

Like I've mentioned, I've decided to heed Chef Willy's suggestions to do without the transfer sheet. I decorated the "trees" with gold and silver powder instead. And included a round of chocolate squares to cover up my glaze as well. 

The one and only mistake I made, and which to me, I wanted to kick myself in the ass so hard is that - my chocolate was too thick. 

Seriously...of all the chocolate lessons I've been through, this is the first time my chocolate is so thick. I really really have no clue at all, until it was time to assemble my cake, I was like staring real hard at the thickness, I thought there was something wrong with my eyesight!!! 

I remove maximum chocolate when I was spreading my chocolate on the sheets, so the only reason I can conclude is that, I may have grab the wrong steel bars; instead of 2mm ones, I may have grabbed the 3mm ones in a haste. =( 


In any case, the exam was finally over, and I was in a jovial, relief mood!! What's done has been done, I can't reverse that, but I really was feeling so happy, so delightful. Ben was also in town, giving me all the moral support I need!

I truly enjoyed the planning and the execution process. The end result was important, but it wasn't as important as the process itself.

Here's a picture of my petite entremet! Many of my classmates commented that it was so cute. Did you feel this way too? :D


Another look! It's the intersection with all the layers - sorry for the bad lighting! It was pretty dark in the room.


Everyone took turns to take a picture with Chef Fabrice while holding up our own creation. Thanks to Rae for sending me this picture; it was taken off from the board, months after our graduation.


Last picture to conclude that examination day!

This was taken during our practice day I believed! Because on the actual examination day, we had NO extra time like this to take photo! HAHAHA! Everyone was rushing like mad!!!

Looking back, I am so glad to have gone through all these with this bunch of people, who have become friends for life, on Facebook etc. The memories is never forgotten! It still feels like yesterday when I've just completed the cake. HAHA!

Again, SP (B) ROCKS TO THE MAX! WOOHOO!! 


Coming up next would be an entry on my graduation!! Lots of photos and of me looking prettily! Cannot believed that this is already the last entry on the last cake I've baked in the lovely classroom kitchen in LCB Bangkok, I am all teary thinking about it again.

=')

Till then!

Sunday, 8 December 2013

Baking - Minions and Chocolate showpiece

Aloha!!

I'm here to update the demonstration carried out on 18 - 21 Nov..I know I've lag behind by almost 2 months! Give me time to upload my photos, gather my thoughts before I update my blog. Thank you!! 

These few weeks has been so much of a whirlwind ride!

I've been spending like 3 practicals = 9 hours to complete one chocolate character and a chocolate showpiece.

Believe me, even with all that time given...it just wasn't enough.


Here is the disassembled parts of this cute little minion with the mustache and mohawk hairstyle. The clothing and all are made out of plastic chocolate, which is something like fondant, but is stickier and can be set using cold spray.


Then, the body of the minion is made out of yellow coloured white chocolate in a huge egg-shaped chocolate mold. White chocolate is always trickier as compared to dark chocolate to work with, because it sets really, really fast. Plus, humidity sets in rapidly too, so we have to work really, really fast.


Chef also made a wonderful blossoming rose out of plastic rose, using the flexible knife to fraiser the ends instead of using our palms. It looks so real as compared to using marzipan. I wish I can do that one day!


Here, we have the lovely chocolate minions done by Chef and his assistant. Greedy little minion holding a mini banana! How cute!  


An old man version next to a rock & roll minion.

Alright, enough of the minions done up by Chef and his assistants! I'm pleased to present to you, our SP (B) family shot!!


It was one of those classes where we had so much fun! Or rather, I had so much fun! And seriously, look at everybody!!! There's a surfer, a tai-tai version wearing pearls and earrings...Mew's harry potter, a baker carrying a baguette, Charmaine's "itching to get beaten" face...

And then, there's mine!!!


Looking all so excited to devour that piece of chocolate cake with whipped cream and cherry! I spent too much time trying to roll out the attire for my minion, and Mew helped me with the shoes. HAHA! Thanks Mew!!


They see me rolling, they hating!!

Next up! It's the demo on Chocolate showpiece - for our term this time, we had to do a chocolate box, with some exotic decoration on the top.

Chef Fabrice did this lovely chocolate box with a nice piped heartshaped cover.


The above chocolate box is the one we have to do...complete with a curved lid, odd egg shape centerpiece with some white chocolate 'straws' and white chocolate eggs which is coloured with green, red, yellow cocoa butter.

Here, we learned the recipe and technique of creating our own silicon mould using gelatin, with which, we used to create the indent found in the egg. 


I liked this the best, with the white chocolate corals, stars and some cut out fish shape...it's like a 3D chocolate aquarium. =D


Then, during the second demo for the week, Chef Fabrice showed us the different ways of creating flowers using different techniques. A fish knife, by spreading on the chocolate sheet and cutting into long triangles after that...etc...


Here's a closer look at the different type of flowers, the left side is done using the method of cutting long triangles, and on the right hand side, the petals is created using the flexible fish knife.

Moving on, here's a look at my dreaded piece of work!


There's so many things I could have done better! Like, the lid - I didn't managed to 'cut' the chocolate mold in time because it set too fast, and hence my lid didn't have the lovely curved texture. Plus, there wasn't enough time for me to complete the things we have to do...I even had to borrow the 'straws' from Tip, who was piping extras but because I felt extremely imposing on her, I didn't take much to cover the base of the egg structure. =(


We also did some of the white coloured chocolate mini eggs, but somehow, the class didn't have enough, so we ended up sharing the halves.


And the flower...oh my god. I've never had any issues with my chocolate flowers, but I screwed up big time during my chocolate showpiece (of all times!!)!! I chose to make the petals using the fish knife method, and when I started to assemble my flower, I realised that I have made all of my petals sideways, and none of them was straight, resulting in a flower that had 'wrap' petals, creating the look of a close flower instead of a blooming flower.

Which is, of course, a big no no! *le sigh!*


Last but not least, the egg!!! Dunno why there is this horrible after mark on the surface, which, most of our eggs has it, perhaps it will be better if we had a chance to air spray coloring over the chocolate. But at least this was my only saving grace! The egg hold up, was of the same size and the exterior looked alright - according to Chef Willy, that is! HAHA!

Oh well! After this whole entire eggy fiasco, I can finally move on and do something else - Sugar that is!!

Till then!!

Wednesday, 27 November 2013

Baking - Panna Cotta, Chocolate Bonbon & Loy Kratong

Hello!! 

I'm here to update on the demonstrations being carried out on 11 Nov - 14 Nov, and touch up a little on my first ever Loy Kratong (Which I can remember) in Bangkok!

First up, Chef Willy did the demonstration on sugar free plated desserts - the Boule Mystère and the Red fruit panna cotta.


The  Boule Mystère consists of a dark chocolate shell filled with chocolate mousse, layers of sable breton, topped with a gold leaf covered chantilly quenelles and finally covered with a red sprayed chocolate dome - which looks super exquisite, and is super duper tough to make; because you have to be really patient and careful while creating the holes so that the shell doesn't break. 

It's sugar free because the sugar is replaced with Manitol, a type of sugar suitable for diabetic patients to consume. 


Next, we have the red fruit panna cotta - which is a personal favourite of mine; I'm always ordering the Panna Cotta in Osia, a restaurant at Resort World Sentosa; their panna cotta is super creamy and delicious with a generous serving of red berries compote.

This Panna cotta is filled within two white chocolate shells, which has two spheres of frozen strawberry and raspberry sauce, presented on a sablee breton disc, sprayed with pink and white spray and finally...decorated with fresh raspberries, rose petals and pulled sugar rings! (More on that later!) 


Meanwhile, I would like to express my heartfelt major thanks to James and Por, the two wonderful assistants who helped create these beautiful miniture desserts for tasting! Super cute isn't it!!!

Presenting to you, my Red fruit panna cotta! 


With plated dessert, we can actually play around with the decorations! Here, I created the red sauce look using a drop of sauce and smearing it with a spoon - the easiest and simplest way to dress up a plate. Chef mentioned that the drop of sauce can be slightly smaller though. HAHA!

My first attempt at pulling sugar - creating rings after rings of pulled sugar. We were all wearing gloves, heating up our hard lumps of pulled sugar in the microwave when it is too cold. Quite fun actually, and the heat from the hot sugar is also quite bearable. =)

The next few lessons will be more on sugar, where we will try to present our first ever sugar showpiece! I'm quite excited but I know it's gonna be a mad rush! Just like how my chocolate showpiece practical went (More on that on the next post!)


Closer look at the chocolate spheres with a nice panna cotta center! Well, you do know that because this is a plated dessert, we get to dig in after presentation right? HAHAHA!


Last look! It could be better in terms of plating! I will just keep improving and improving through practicing, I supposed!

Next up, we have the Chocolate Bonbon for the next two demonstrations! On the first day, we had Hazelnut Praline and cinnamon ganache and Cappuccino Ganache.


The Hazelnut Praline and cinnamon ganache is type of chocolate bonbon with a praline bottom, topped with cinnamon infused ganache, and chablonnage with milk chocolate bottom, and left to set outside over night in a chocolate room so that it sets well and proper and retains its creaminess.

It is quite a beautiful flavour, with the cinnamon spice kicking in after, complimenting the taste of hazelnut.


Then, we have the cappuccino ganache, which is filled inside these beautiful shaped chocolate bonbon molds!

Chef also decorated it with some modeling chocolate flowers, jelly, transfer sheet, etc.


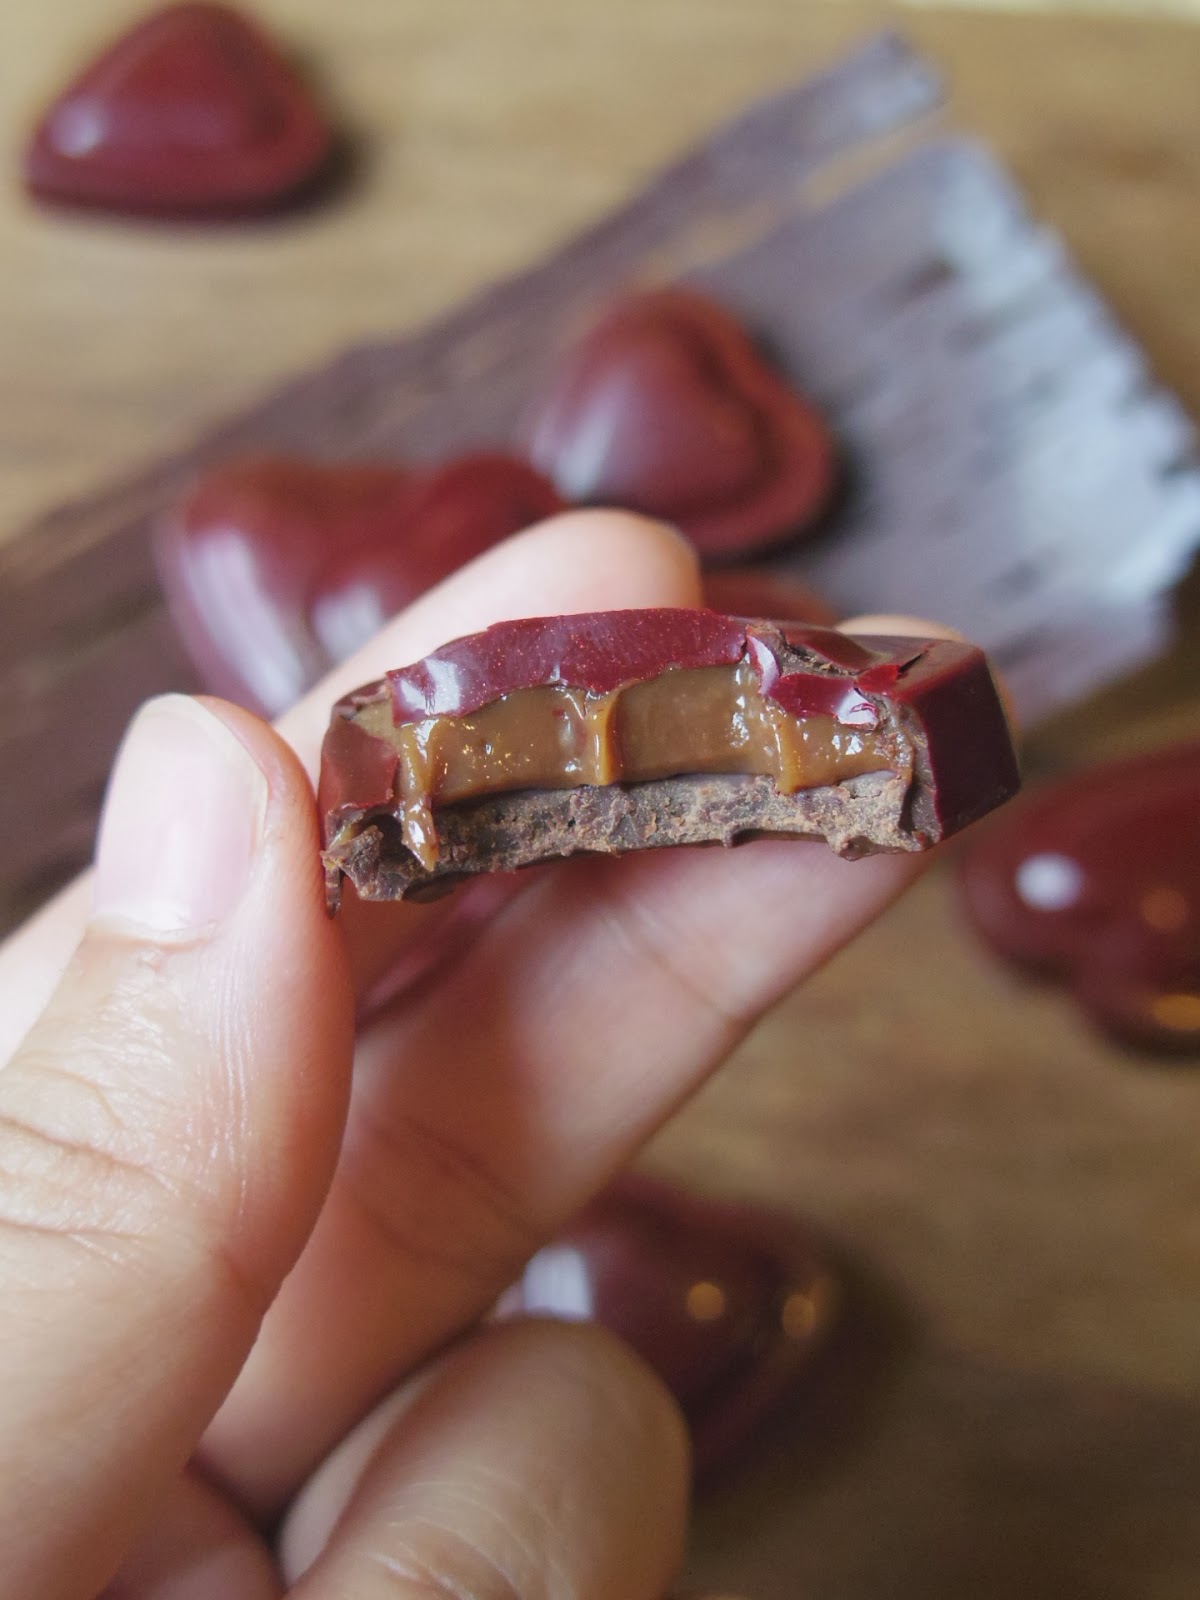
Here's a look at my Chocolate Bonbon! I chose to do heart shaped because it was my hubby's birthday and I wanted to send him some love! HAHA! 


The chocolate mold is sprayed with red cocoa butter, with a little gold powder, filled with chocolate, remove maximum so that the chocolate shell is thin...filled with the ganache and then covered with chocolate and let set with a plastic sheet over the back so that its shiny!


I took the chance to make a chocolate dish using a technique I learned from a book; Working with Chocolate. It could have been better if my chocolate threads was piped slightly thicker, because more than half broke off due to the connecting "threads" being too thin.


A look on the inside! The bottom chocolate should be slightly thinner, but as this is the first time we did chocolate bonbon with mold..I didn't know how to gauge how much more of fillings I should have piped. =P


Next, the last demonstration for the week is still on Chocolate bonbon, but in the form of doing chocolate bars with different fillings! 


Here, we have the crystallized hearts, which is made with pastillage (made from gelatin powder and SQ icing sugar, mixed together till it forms a nice soft dough, which can be rolled out), and soaked in candy syrup made of water and crystallized sugar for nearly 4-5 days.

The result of that is sugar crystals forming around the heart, creating a beautiful, sparkling crystal heart.


Then, we have the chocolate bars with dry fruit/nuts! Chef advised that by adding dry products like fruits or nuts to chocolate, it can help prolong the shelf life of the chocolate product.


Next, we have the Caramel Passion fruit ganache (which was a super hot favourite!!), filled with passion fruit puree, and decorated with colourful cocoa butter dye. It's like graffiti art!! I love the look and fell in love with the taste, the sweetness of the white chocolate is reduced with a nice sharp tangy sourness of the passion fruit!

I would make this bonbon when I'm back! 


For our practical, we have the chocolate bar with vanilla ganache with tonka beans! Tonka beans is a type of spice that is commonly used in perfume making, and is super duper fragrant. It has the fragrance of Vanilla, and hints of cinnamon, if I am not wrong!


Last but not least, Chef created a sample piece using left over nuts and chocolate, rolled between two bubble wraps, let set and randomly cut to sizes! These chocolate bits are equally delicious, and can be samples for little kids and adults to try.

Presenting to you, my chocolate bars with vanilla ganache and tonka beans! =D 


It's a pity that my chocolate set a little too fast upon pouring, and hence when I scrapped to remove the excess at the back, my chocolate wasn't smooth at all, instead, having these wavy curves. =(

Oh well, after the usual school week, I had something to look forward to, on Sunday! It was the Loy Kratong Festival - where we apologise to the Mae Nam (Mother Nature/water) for polluting the water, and in this water latern, we put in a coin, a clipped nail and a strand of our hair to symbolize washing away our bad fortune so that we have good fortune in the coming year!


Some of the beautiful Kratongs available for sale! My friends, Jane and Mew and myself, took a Tuk tuk down to Asiatique, where I've heard that the people in Bangkok usually head to, to release their kratongs. We took a tuk tuk instead of the ferry because boy, the whole place is super crowded and packed! The traffic jam was 2 hours over from the main road to the Asiatique itself!

We count our lucky stars that the Tuk tuk driver knew the shortcuts. He was speeding all the way though, and we hanged on for our dear lives! It was also a good thing that we reached our destination in less than half an hour.


This is my Kratong! I initially bought another kratong with roses and all, but it was a mistake! The kratong was made with a foam bottom - and this was made with a coconut tree disc (I think), anyway, something organic that won't harm the sea lives in the sea.


 Jane, Mew and myself! 


Sorry for the blur photos - taken with my phone. 


Lovely, lovely kratongs! Besides these lovely flowers and leaf type of lanterns, there was also lanterns made out of bread, biscuit, etc!


There was so much going on, there was a night market along the road for a food fair event, we also had dinner at a nice live bar restaurant place right next to the ferries wheel. It kept raining water droplets though, because of the condensation from the ferries wheel.

The journey back home was super tiresome! We were stuck in traffic on a tuk tuk for 2.5 hours! There was two lanes, but one of the lanes was occupied with party goers (What the hell are the pavements for!!) and there was this one stupid car who occupies two lanes! And the rest of the other cars doesn't even honk or anything. This continues for another 45minutes or so. Like seriously?!

When I finally got back home, I had a major pimple from the pollution. =(

Ah well! At least I had fun! =D

Alright! That pretty much sums up my wonderful week! Next up, will be an upcoming post on my first ever chocolate showpiece! I'm dreading to show it actually, because I could have done so, so much better. Oh well!

Till then!